Latest Posts

No fat wrap

Vegetable wraps

Buenos Aires Herald
On Sunday supplement
Food and Wine

It had to come up sooner or later, someone was going to ask about “fat free vegan” options for something at home. Something that wasn’t just an undressed salad or crispy rice cake. Thankfully, at least this time, they didn’t throw in “gluten free” or I might have just given it all up as a bad day. Combine that with just having worked my way through a couple of books on the subject and I was ready to tackle something new in the kitchen.

I don’t know that I need to get into the pros and cons of either a vegan lifestyle or an ostensibly fat free one. There’s plenty of source material out there that comes down on either side of the questions, and I think I can safely leave it in your hands to make your own decisions about what works for you. Want to go the other direction and head to a carb-free, meat heavy diet, you’re good to go from my perspective – whatever works for you.

I would say that I find the combo a bit restrictive. It’s not that one can’t come up with some great food to eat, and hopefully today’s recipe will give you a good example. It’s more that there’s so many ingredients out there that a diet like this leaves out – it’s one that I could never commit to without some overriding reason. But, as a change up for meals once or twice a week, it’s certainly a good balancer to whatever else I might be ingesting.

So what does a fat free vegan diet leave out? Beyond the obvious “no meat or dairy products”, including eggs, and, for most vegans, honey as well, the fat free restriction eschews chocolate, nuts, avocados, and all plant-based oils and fats – which, by the way, includes leaving out a large number of soy products unless they’re low fat versions. It’s not truly fat free, many vegetables and grains contain some level of fat naturally, but it’s a “no added fat” and no members of the plant kingdom that contain excessive amounts. Most folk who adhere to the diet are doing it for cardiovascular reasons, and so often, there’s a no added salt restriction.

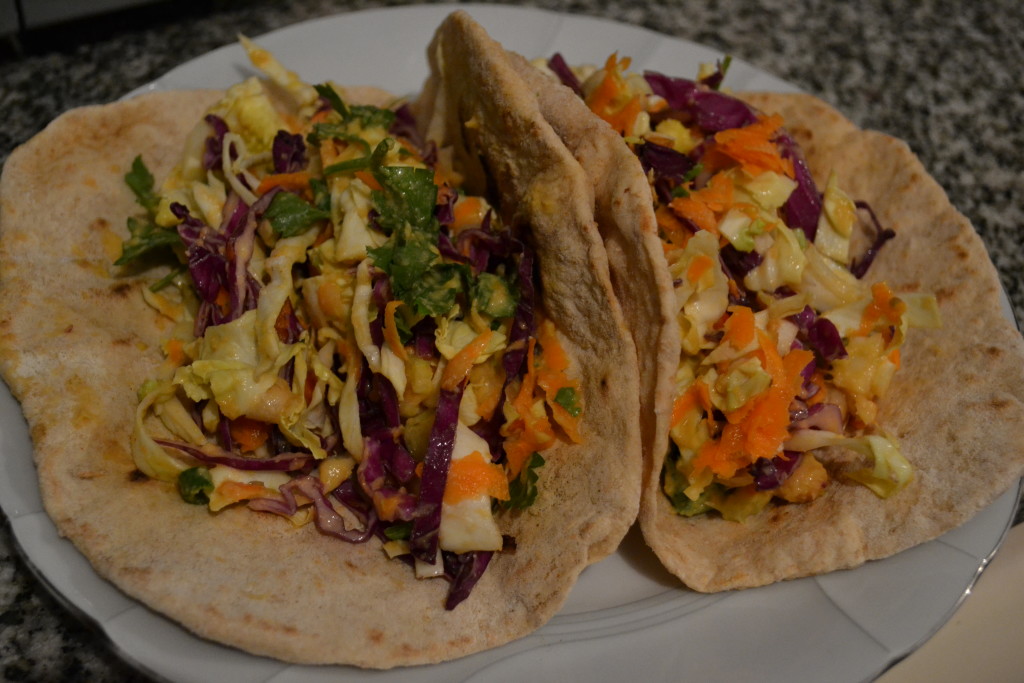
So what that means is getting creative with vegetable purees, juices, herbs and spices for flavorings, generally some form of legume for those creamy mouthfeel sorts of experiences. And, that’s what we’re going to do today – a healthy, vegetable based wrap that makes for a satisfying lunch or lighter dinner. And, away we go.

First, the wrap – a whole wheat tortilla. You’d be surprised how easy these are to make – a simple 1:1 weight ratio between finely ground whole wheat flour and water – we get six decent sized tortillas out of:

175 grams whole wheat flour
175 ml/grams water
½ teaspoon salt (optional)
½ teaspoon smoked paprika

Mix well with a whisk to break up any lumps and let sit for about ten minutes to hydrate the flour. Heat a heavy skillet over medium heat. Divide the dough in six equal portions (or, 4 or 8, depending on how big you want them) and roll out to about a 20 cm circle. Lay them one at a time in the hot skillet – no oil needed. Cook until it’s lightly browned on the underside and then flip it over and cook the second side to the same. It should still be quite flexible. Repeat with each remaining tortilla.

For the filling:

¼ of a small red cabbage
¼ of a small white cabbage
2 green onions
1 medium carrot
4 asparagus
4-5 stems of cilantro
1 can white beans

1 can chickpeas
Juice and zest of 1 lemon
½ teaspoon cumin
1 small chili
2 cloves garlic
1 small carrot
1 tablespoon sesame seeds, toasted (optional, they add some fat)
water as needed

Slice the cabbage into thin shreds. Chop the green onion, asparagus and parsley. Grate the carrot. Open the can of beans. Toss them all together in a bowl.

Open the can of chickpeas – essentially we’re making a no fat added hummus. Pour the can into the blender and add the other ingredients. Blend at high speed, only add water as needed to get a smooth puree. Mix the puree with the vegetables and pile into the tortilla wraps. Roll up (if you want to make it pretty, stick a toothpick in it to hold it all together). Eat. Feel free, by the way, to mix up the vegetables with others, to use a different herb or a mix of them, and adjust the spiciness of the dressing with more or less of the chili and garlic.

A series of recipes and articles that I started writing for the Buenos Aires Herald Sunday supplement, Food & Wine section, at the beginning of 2012. My original proposal to them was to take local favorite dishes and classics and lighten them up for modern day sensibilities. We’re not talking spa or diet recipes, but at the very least, making them healthier in content, particularly salt, fat and portion size. As time went by, that morphed into a recipe column that, while emphasizing food that is relatively “good for you”, wasn’t necessarily focused on local cuisine. At the beginning of 2013 I decided to stop writing for them over some administrative issues, but it was fun while it lasted.
Facebooktwitterredditpinterestlinkedinmail

No Fat Vegans

Those of you who’ve been reading my posts for awhile might remember my critique of The China Study a couple of years back. Keeping in mind that my criticism was directed mostly at the book, not at the concepts it presented, I try to keep an open mind. In fact, here at home, the majority of what I eat tends to be vegetarian, often even vegan – and here and there a bit of seafood and chicken. We virtually never eat red meat at home, well, I don’t, sometimes on request I’ll cook it up for Henry. It isn’t an ethical commitment, it’s simply I tend to feel better without eating it – I’ll still indulge on occasion if we’re out and about, but it’s rarer and rarer.

Anyway, that book and another, which I’m going to get to today, led to viewing the movie Forks Over Knives – it’s not a movie that presents any particularly new information, but given that a large percentage of the population wouldn’t pick up a book of the genre, it’s a film that they might. Well, probably not unless it airs on television because let’s face it, the likelihood is that the only people who saw it were people already interested and quite possibly committed or thinking about a change in diet. What’s particularly noteworthy is that the movie is pretty much based on these two books and the work of the two authors, both of whom, though they quote each other’s work, and know each other, like to claim that they’re the only person really out there making an effort to change things. Book publicity I suppose.


What I really should do is just tell you to go read the other critique. Why? Because I could almost copy it here. Okay, there’s some different focus, the studies are different, this book is actually better written and a more interesting read, and, the author’s wife packs the last section with recipes. But, Caldwell B. Esselstyn, Jr., M.D.’s Prevent and Reverse Heart Disease: The revolutionary scientifically proven, nutrition-based cure in many ways might as well be the same book.

Again with the bludgeoning, though at least here the good doctor swaps back and forth between the phrases “plant-based nutrition” and “plant-based diet” almost as fast as Mitt Romney can switch positions on an issue. He does go a step further than the vegan diet recommended by T. Colin Campbell, PhD – he goes for full on vegan plus – eliminating chocolate, nuts, avocados, and plant-based oils (though, strangely, after deriding all types of nuts in several places, other than walnuts, which he considers acceptable, the recipes in the book often make use of nut milks…). In fact, if one gets to the end, while not officially limited to it, the recommendations are so overwhelmingly restrictive that only the most dedicated would follow them – “It is helpful to keep breakfast and lunch simple – and nearly the same every day.” The breakfast recommendations were pretty much all variations on oatmeal made with fruit juice instead of water or milk, and the lunches were pretty much undressed green salads. Example dishes touted for dinnertime include black beans and rice that we could eat just as is, every single night, and apparently be perfectly happy about, or maybe the much touted bowl of boiled, unseasoned kale.

But back to some of the science. Thankfully, the book isn’t as loaded with numbers and graphs as the other one, part of what makes it easier to read. Instead, it’s basically chapter after chapter of personal anecdotes and those of the doctor’s patients who participated in his scientific study. Here’s, however, where I get all uppity about the numbers. You see, that revolutionary (as if no vegan before had ever suggested that a switch to the diet could be beneficial healthwise) scientifically proven study consisted of 24 people. Well, really 18 people because 6 of the folk who agreed to be in the study gave it up as a bad thing after a brief fling at it. There was no control group to compare against, the doc’s clinic decided that wasn’t in the budget. There was no accounting for any other life changes – in fact the doc specifically poo-poos the idea that exercise is all that important because he’s not familiar with any studies proving that exercise is good for heart disease. His statement, not mine. Yet, he notes, anecdotally, that all of his patients became more active and got into exercise – he considers it an after-effect of the diet and it’s cure, rather than an adjunct cause.

And while he studied those 18 folk over a long period, a couple of decades, his studies are based on self-reporting. Oh yes, he drew blood and did laboratory analyses, but he relied on the patients in his study to account for how well they stuck to the diet. And he’s quite sure they all did because they told him they did, and why would they have any reason to lie about it? Certainly not his admonition that anyone who reported straying from the diet would be dismissed from the study…. Strangely, in a moment of candor, he admits that he strays from the diet himself – claiming just once a year on New Year’s Eve when he binges out on Reese’s Peanut Butter Cups. Sure, I buy that. Just once a year. But of course, none of the patients would do such a thing. Right?

To be honest, at the end of the book I think I’d be less likely to even consider a vegan diet than at the beginning, unless I was in the dire circumstances of one of his patients. Oh, did I forget to mention that they 18 folk who participated were all basically at death’s door, their regular docs had told them to put their affairs in order and go home and die. These were folk who had had multiple heart attacks, bypasses, were on major medications, and nothing was working, so perhaps, just perhaps, they had some impetus for doing something truly radical. Interestingly, he does go back and mention that twenty years on he followed up on those six folk who walked out on the study and one had died and five of them still had heart problems. Ummm, wait, these were people who were supposed to be all dead within minutes if they didn’t participate in the study. Right?

So, another diet book written to spout a philosophy that no doubt has some validity behind it, but isn’t really doing much of anything but lining the author’s pockets. If he was as truly committed to what he claims to be committed to as he says he is, he’d be putting the information out there for free.

Maybe I should take on critiquing one of the diet books at the other end of the spectrum – a little Paleo or South Beach or something of that sort… hmmm.

Facebooktwitterredditpinterestlinkedinmail

Thistle me a tune

Artichoke preparation

Buenos Aires Herald
On Sunday supplement
Food and Wine

When the same question pops up in your life several times in one week, with no particular impetus, the universe is trying to tell you something. Or, it’s just a coincidence. Pretty much the same thing. But it does get you thinking, or me thinking. So when three different people this week asked me “How do you prepare an artichoke?” it became a part of my daily thoughts. Fit in somewhere around waiting six days for the local cable conglomerate to get around to fixing service here in the ‘hood.

It’s one of those things I learned to do in cooking school a long time… more than a generation, ago. Maybe two. And it became something that I simply do, without thinking about it. But I get it, I mean, who thinks about preparing an artichoke? They’re pretty, but they’re daunting. It’s probably why my mother never did anything with them but snip off the tips of the “leaves” and then steam the heck out of them so that we could pluck them and scrape off the juicy “meat” at the bottom. I never had an artichoke any other way until I was out in the world, working in the restaurant industry.

So first off, just what is an artichoke? We’ve all seen them. Right now they’re in season here in BA and piled high in every verdulería. A month ago my neighborhood stand was selling them for 7 pesos apiece. This morning they were offering them up 4 for 10. Look at them closely – they look like a sort of scaly greenish pinecone or maybe something out of Avatar. What they are is a flower. A thistle flower. Actually, an immature flower surrounded by protective leaves. Now, as to what artichokes think they need protection from, I have no idea. But they’re protected.

There are several kinds of artichokes out there, either green or purple or a mix. All of them originated in Sicily, and from there, spread to wherever Sicilians and then later, Italians spread. The large green ones we see here are either the Camus de Bretagne or the Blanca de Tudela variety – I doubt I could tell the difference side by side, the biggest difference is simply size – unless you want to get into DNA testing. Argentina and Chile combined produce about 36% of the world’s artichokes. Who knew?

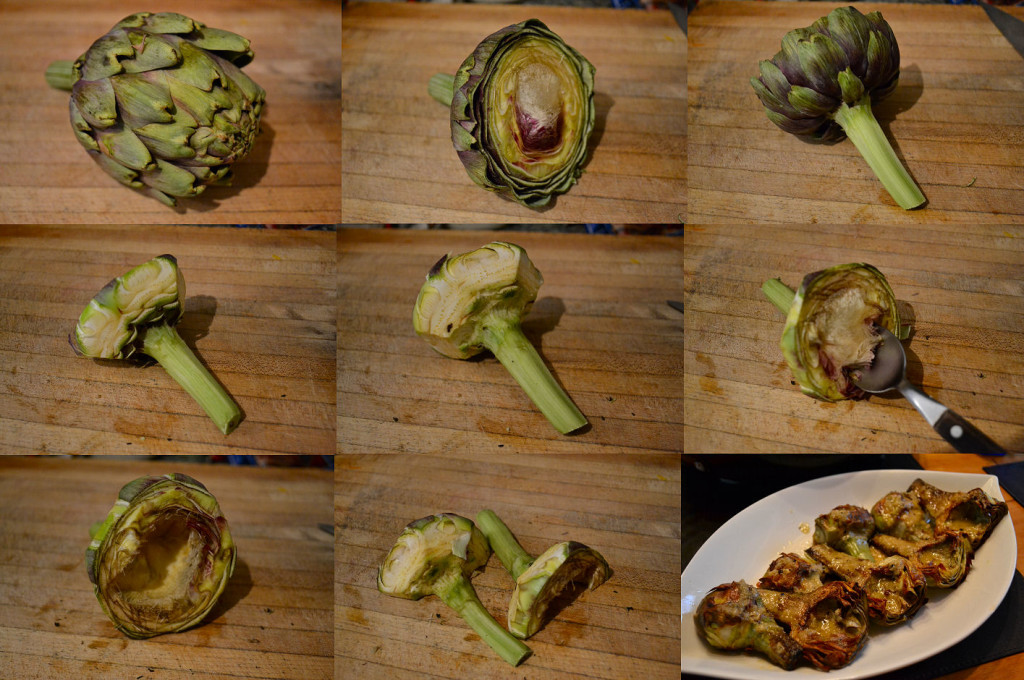
So, let’s get to it. I’ve provided a sort of step-by-step photo guide to see what the vegetable should look like after each process. Hopefully that’ll help.

1) set your artichoke on a cutting board. 2) using a large, sharp knife, cut across it about 2 cm from the base of the flower. 3) Turn it around and using a vegetable peeler, peel the stem down to the light green inner part (which is edible too). 4) Back to that big knife, place the cut side of the artichoke down on the board and just cut around on an angle, taking off the leaves and exposing the outer edge of the heart. 5) With a small knife, basically scrape out the seam between the stem and the heart that you can’t quite get to with either peeler or the big knife. 6) Get a spoon and stick in alongside the hairy “choke” in the center and then work it around in a circle to scoop out the choke. 7) Use the spoon to scrape out any remaining hairs, so to speak. 8) For this recipe, cut it in half lengthwise – though this will depend on what you’re going to make with them – and, stick them in a bowl of water with some lemon juice or vinegar to prevent them from turning brown in the air.

Artichokes “in Escabeche”

8 artichokes (1 little over a kilo)
1 lemon, cut in half and squeezed into a large bowl of water
240 ml extra virgin olive oil
1 bay leaf
3 large cloves garlic, peeled
½ teaspoon salt
1 tablespoon good quality sherry or fruit vinegar and more for drizzling
Extra virgin olive oil for drizzling

Prepare the eight artichokes as above and put in the bowl with the lemon water.

In a skillet, heat the olive oil over medium to medium-high heat until nearly smoking, about 10 minutes of preheating, then cook the artichoke hearts with the bay leaf until golden brown on the outside and until a skewer or knife tip glides to the center of the artichoke heart without too much resistance, about 5 to 6 minutes. Remove from the oil with tongs or a slotted spoon and transfer to a shallow serving platter or bowl.

Meanwhile, pound the garlic with the salt in a mortar. Stir 3 tablespoons of the oil you cooked the artichokes in into the garlic, ½ tablespoon at the time. Now, stir in the vinegar ½ teaspoon at a time until the garlic is a creamy looking sauce. Spoon small amounts of this mixture over the artichokes. Drizzle the artichokes with olive oil and a splash of vinegar and set aside to cool and absorb flavors before serving. Season with salt and pepper if necessary.

A series of recipes and articles that I started writing for the Buenos Aires Herald Sunday supplement, Food & Wine section, at the beginning of 2012. My original proposal to them was to take local favorite dishes and classics and lighten them up for modern day sensibilities. We’re not talking spa or diet recipes, but at the very least, making them healthier in content, particularly salt, fat and portion size. As time went by, that morphed into a recipe column that, while emphasizing food that is relatively “good for you”, wasn’t necessarily focused on local cuisine. At the beginning of 2013 I decided to stop writing for them over some administrative issues, but it was fun while it lasted.
Facebooktwitterredditpinterestlinkedinmail

A-maize-ing

Mexicali Corn

Buenos Aires Herald
On Sunday supplement
Food and Wine

You all know what corn is, right? Raise your hands if you do. Good, most of you anyway. Corn, or, more properly in most parts of the world, some variation on maize (the word derives from the native Taíno language where it is simply maiz, directly adopted into Spanish), is the most widely grown crop in the Americas, despite attempts to change that over to soy.

What you may not know is that it’s a hybrid plant. You go back a couple of thousand years and you find two entirely different plants that at some point either naturally or through human manipulation, were crossbred to produce some variety or another of maize. And there are some varieties – at least a couple of hundred different ones – there are more than a hundred just of what we think of as yellow (or white) sweet-corn. That doesn’t begin to get into the variations on colors that are available, the types with very large kernels common in the Andes, or the sorts used for making popcorn.

And, there are more recipes for what you can do with these golden ears of goodness than I’d care to count. On or off the cob, pureed, mashed, whole, boiled, steamed, fried, grilled, the list goes on and on. So I won’t.

Back when I was growing up in the 60s in the Midwest of the U.S. there was a sudden interest in “Mexican food”. We’re not talking about anything that anyone in Mexico would have recognized as Mexican cooking, but there was just this sudden appearance of dishes in all the ladies’ cooking and home magazines that included the just as suddenly available chili powders and other ingredients purported to make things… Mexican. Somewhere around that time the earliest versions of what came to be called Cal-Mex cooking, a sort of fusion of southern California ingredients and sensibilities with ideas and flavors supposed to be from Mexico. Some folks called it, early on, Mexicali instead, but that never really caught on, with the exception of one dish that took North American home economics kitchens by storm… Mexicali Corn.

As to just what the dish is, or was, seemed to vary with the magazine it was presented in. And with time, the ingredients have changed from those early years to much more elaborate, and, fresher ones. I’m pretty sure that when my mother prepared it (or, more likely, bought in lovely plastic bags of pre-mixed and frozen from either Birdseye or Green Giant), it contained corn, green and red bell pepper, maybe some onion, and a dash of the ever so exotic at the time, “chili powder”.

The thing is, the stuff is good. It’s really good. Especially if prepared right, with lovely fresh ingredients and spices. And that’s just what we’re going to do here. We tend to serve it alongside everything from grilled or sauteed chicken breasts to fish to whole, rice-stuffed calamari. Have fun with it!

Mexicali Corn

4 ears of fresh corn, still in the husk
1 red onion
1 red bell pepper
1 green bell pepper
3-4 cloves of garlic
2 jalapeños
1 teaspoon ground cumin
1 teaspoon ground coriander
1 small bunch of cilantro
2 limes
2 tablespoons of olive oil
salt and pepper

Once again we’re going to either fire up the grill or put a cast iron skillet on the stove top over high heat. Keeping the corn in the husk allows us to grill them until the kernels soften and lightly color, while the husk burns a bit but protects the corn itself. If your corn is already peeled you can cook it the same way, just turn it more often to prevent it from burning. Once you’ve grilled them well on all sides, remove them from the heat, let them cool, strip off the husk, and cut the kernels off the ears. The easiest way to do that is cut the ears in half across, stand the now flat cut surface on your cutting board, and use a good sharp knife to cut down along the cob in four or five cuts, top to bottom.

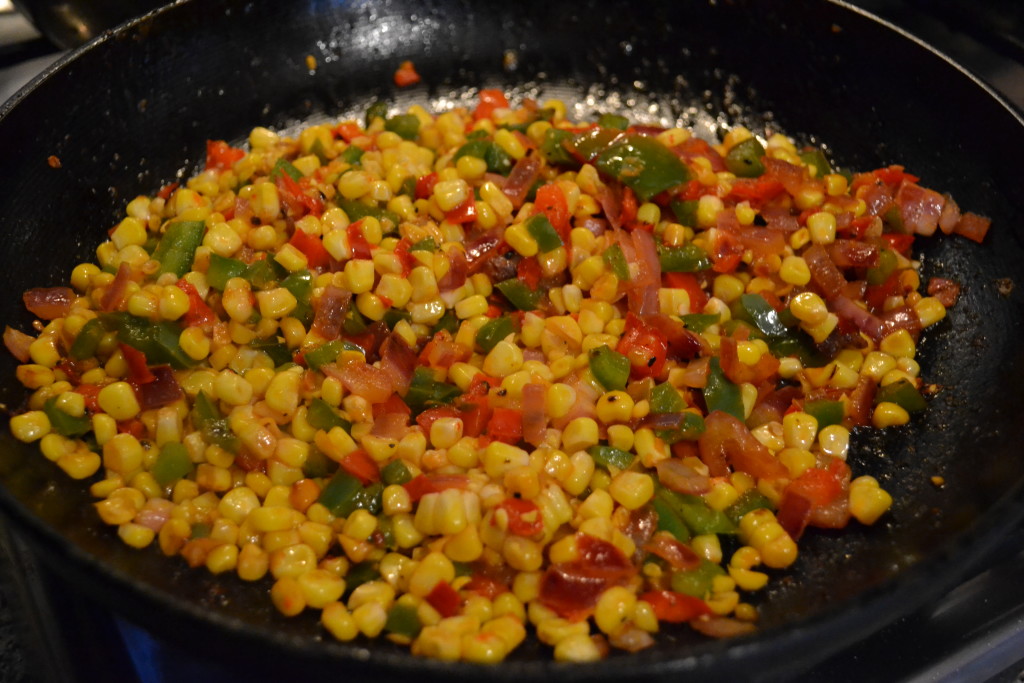
Chop the onions, peppers, garlic and cilantro. In a frying pan heat up the olive oil. Saute the onions, garlic, peppers and spices with a little salt and pepper until soft. Add the corn that you’ve cut off the cobs. Cook for 2-3 minutes just to blend the flavors. Off the heat, finish by tossing with the chopped cilantro and the grated zest of the two limes. Adjust the seasoning to your tastes with salt and pepper.

A series of recipes and articles that I started writing for the Buenos Aires Herald Sunday supplement, Food & Wine section, at the beginning of 2012. My original proposal to them was to take local favorite dishes and classics and lighten them up for modern day sensibilities. We’re not talking spa or diet recipes, but at the very least, making them healthier in content, particularly salt, fat and portion size. As time went by, that morphed into a recipe column that, while emphasizing food that is relatively “good for you”, wasn’t necessarily focused on local cuisine. At the beginning of 2013 I decided to stop writing for them over some administrative issues, but it was fun while it lasted.
Facebooktwitterredditpinterestlinkedinmail

Getting all medieval on your chicken

Spicy Green Olive Chicken

Buenos Aires Herald
On Sunday supplement
Food and Wine

While fried chicken is, in many people’s minds, automatically associated with the southern United States, it’s certainly not the origin. There’s enough archaeological evidence to trace deep-frying chicken back to the medieval era and likely before. Throughout that time period and throughout both Eastern and Western Europe, folk were frying up chickens and other birds with abandon. Recipes were already codified, which would indicate that they had long histories by that time period.

In the U.S., the dish was introduced by the Scots, many of whom settled throughout the south. Being the epoch of slavery, it’s not surprising that the serving class, mostly black, were the ones tasked with making the dish. And, as with many dishes, they put their own spin, based on the spices and flavor combinations they brought with them from the African repertoire, on it. The close association with the community was furthered by the fact that chickens were often the only animal they were allowed to keep and cook for themselves, lending to more and more innovation.

But back to Europe and, perhaps, the origins. Even that is in doubt – after all, the domestic chicken is a crossbred animal imported from southeast Asia, and there are certainly fried version of fowl in the various canons of cooking from that region of the world. One of the most popular dishes in Indonesia is ayam goreng, which is, well, fried chicken. So who fried that first chicken? We’ll never know, and in truth, we’ll probably never really care. We just like to eat it.

In this week’s column we’re headed to a traditional pollo fritto from Italy, and in particular a version from the south central regions – probably originating somewhere around Umbria, back in time. It’s not a common dish these days because it’s fairly picante, and over the last century or so many of those old spicy dishes have been left by the wayside. I mean, try to find a good spaghetti all’assassino anywhere outside of some small villages in Basilicata. Much like here in Argentina where over time, many of those older, more fuerte dishes, seem to have been dropped from the repertoire. Hmm, there’s an idea for some future columns, bringing back some of those older, more “puta pario” dishes that local friends tell me their grandparents used to make.

So, let’s, to quote a TV chef of note, kick it up a notch, and “bam”, put out a spread of some spicy fried chicken.

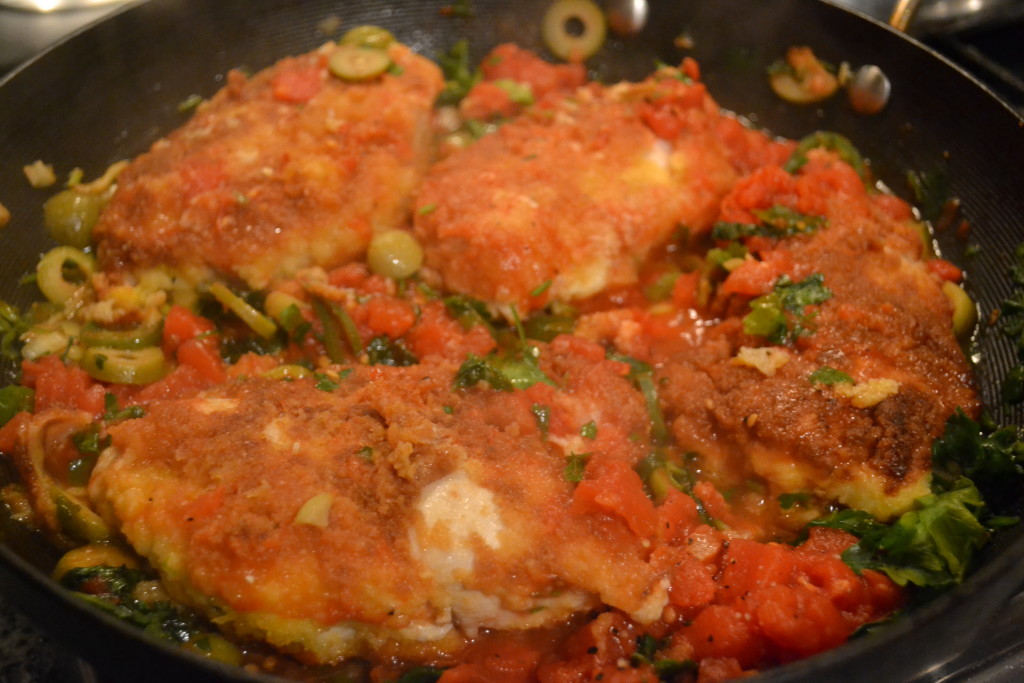
Spicy Green Olive Chicken

4 chicken breasts, butterflied or pounded flat
60 grams flour
1 egg, beaten with 25 ml milk
100 grams breadcrumbs (panko are best)
25 grams grated hard cheese
1 standard can plum tomatoes (roughly 240 grams) – peeled and crushed
4 garlic cloves, sliced
12 green olives, pitted and sliced
4 hot chilies, sliced
50 ml balsamic vinegar
good handful of mixed herbs, chopped (parsley, oregano, basil are good choices)
50 ml olive oil

Make a mixture of the breadcrumbs and cheese. Dip the chicken pieces in flour, then in beaten egg, then in the breadcrumb mixture. Fry in oil until lightly browned. Add the garlic, olives and chiles to the pan and continue to cook for 3-4 minutes. Add the tomatoes and balsamic vinegar and cook, turning the chicken over every minute or two, until you’re sure it’s cooked through – about another 5-6 minutes. Add the herbs and serve – our favorite accompaniment to this is either a simple pasta, or better yet, some baked macaroni and cheese.

A series of recipes and articles that I started writing for the Buenos Aires Herald Sunday supplement, Food & Wine section, at the beginning of 2012. My original proposal to them was to take local favorite dishes and classics and lighten them up for modern day sensibilities. We’re not talking spa or diet recipes, but at the very least, making them healthier in content, particularly salt, fat and portion size. As time went by, that morphed into a recipe column that, while emphasizing food that is relatively “good for you”, wasn’t necessarily focused on local cuisine. At the beginning of 2013 I decided to stop writing for them over some administrative issues, but it was fun while it lasted.
Facebooktwitterredditpinterestlinkedinmail

Veg on a spike

Vegetable brochettes

Buenos Aires Herald
On Sunday supplement
Food and Wine

With spring arriving on our doorstep the verdulerías are in bloom with a riot of color. Beautiful vegetables are piled high and calling out to be used for something, anything. And, it’s time, if you have one, to start thinking about breaking out the parrilla – scrape off all that crusty stuff left from the last barbecue – you know you said you’d get to it another day and then forgot about it. Go look, really.

Of course, not everyone has a grill at home, and for those who don’t, there’s nothing wrong with a stovetop grill, ridged or not, or even a bit hulking frying pan, preferably something heavy like cast iron. Most of the year we can’t quite get ourselves to spend the time firing up the charcoal, it’s a whole lot easier to stick the plancha on top of a couple of burners and crank the flame up underneath.

So now that we’ve got all that out of the way, some heat in the offing, and vegetables that you enjoy piled up on the counter, it’s time to get to work. We’re going to make brochettes, kebabs, skewers, spiedos, pinchos, whatever name it is you like to use. You’re going to need skewers, whether metal (much preferred for this), or wood. If you use the latter, soak them in water for an hour or two before threading the vegetables on them, it will cut down on them burning.

So here’s dinner at our house when we’re in the mood to stick a veg or two on a spike….

Vegetable Brochette

1 large onion
1 green bell pepper
2-3 red frying peppers (ají vinagres)
4-6 mushrooms
1 medium eggplant
1 medium zucchini
2 tomatoes
salt and pepper
olive oil
salsa verde

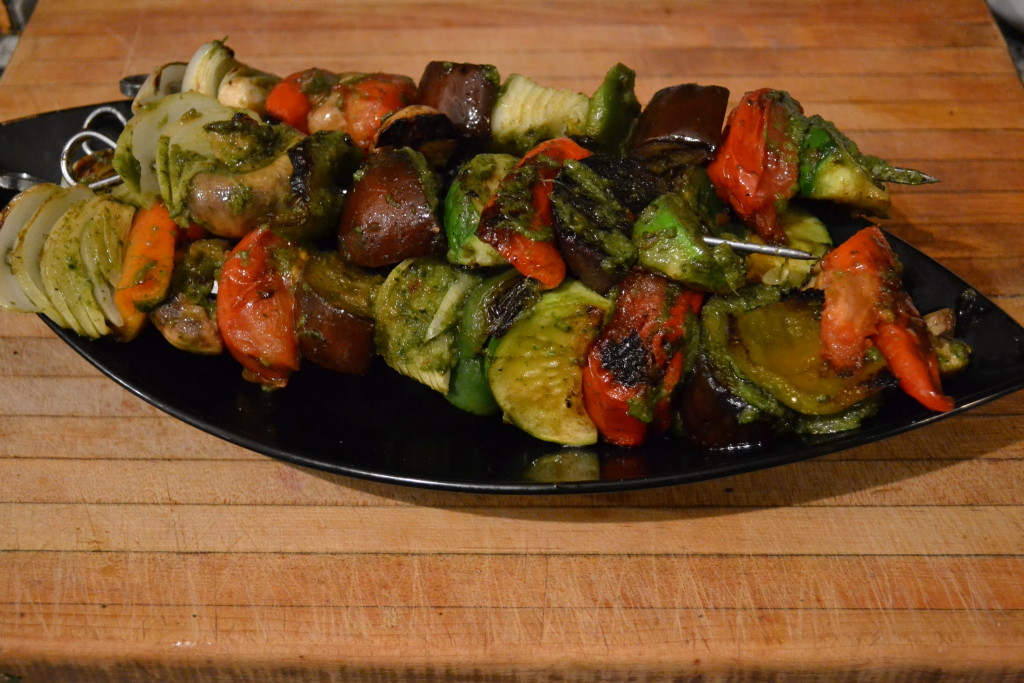
Basically, cut all the vegetables into wedges or pieces that are 2-3 cm across. Wedges are great where possible, squares, rounds, whatever works for you. And then, poke the skewers through them, mixing up the vegetables so that they look pretty. Sprinkle them with salt and freshly ground pepper, and then drizzle them lightly with olive oil on all sides.

Onto the grill with the skewers – it should be really hot to start with, we’re looking to just get a bit of a sear, or caramelization, on the surface of the vegetables. Turn them after you get a little bit of color, maybe 1-2 minutes, and just do that until all sides have a touch of browning.

At this point, turn the heat to low, or move the skewers to a low heat part of the grill. Take your salsa verde and brush the upper surface of the brochettes, and then turn that to face down. Keep doing that every couple of minutes until the vegetables are cooked through – in total, we’re looking at about 5-6 minutes for the first part of browning, and then maybe 12-15 minutes of cooking over lower heat, regularly brushing on our sauce.

When they’re cooked through and nicely browned, serve them up on a platter alongside some simple rice – whatever your preference is for type. When we can get it, we love to use wild rice or a mix of wild and white.

Salsa Verde (Green Sauce)

This is one of our staples in the kitchen, it’s incredibly simple to make, and pairs well with vegetables, meat, pasta, gnocchi – really, wherever you want an intense herb flavor. Traditionally it’s not a vegetarian sauce, but there’s an easy fix for that.

1 large bunch of mixed fresh herbs (parsley, chives, cilantro, dill – whatever you like)
1 handful of arugula leaves
3-4 anchovies (if you want to keep this vegetarian, use a tablespoonful of miso paste instead)
2 garlic cloves
1 tablespoonful of capers
6 green olives, pitted
100 ml good olive oil
salt and pepper

Put everything into a blender or food processor, set to stun, and go for it. When it’s nicely pureed (add more oil if needed to get a smooth puree), adjust the seasoning to your tastes and start using.

A series of recipes and articles that I started writing for the Buenos Aires Herald Sunday supplement, Food & Wine section, at the beginning of 2012. My original proposal to them was to take local favorite dishes and classics and lighten them up for modern day sensibilities. We’re not talking spa or diet recipes, but at the very least, making them healthier in content, particularly salt, fat and portion size. As time went by, that morphed into a recipe column that, while emphasizing food that is relatively “good for you”, wasn’t necessarily focused on local cuisine. At the beginning of 2013 I decided to stop writing for them over some administrative issues, but it was fun while it lasted.
Facebooktwitterredditpinterestlinkedinmail

Toasted ravioli

Toasted Ravioli with Mussels

Buenos Aires Herald
On Sunday supplement
Food and Wine

If you haven’t figured out by now, I’m a bit of a pasta fan. I don’t care if they’re long and thin, short and fat, straight, bent or twisted. Toss those noodles with a sauce, vegetables, meats, whatever may occur to you, and likely, I’ll eat it.

Now, if you were to ask most folk about cooking pasta, they’d tell you to boil it up, in salted water, maybe with some oil mixed in. And there’s nothing wrong with that.

But, this weekend, we’re not boiling our pasta. We’re baking it. Baking you say? Why yes – pasta doesn’t have to be boiled – it is after all, simply a dough made from flour and water, often with egg. And, if you stop and consider, lasagna is baked… right there, you’ve baked pasta – though, likely, you gave it a quick parboil first. No, today, we’re simply going to bake it.

This isn’t unheard of. For those of you from the U.S., particularly from, say, the “Show Me State” of Missouri, you might just be familiar with St. Louis Toasted Ravioli. Traditionally, a straightforward meat or cheese filled round of dough, dipped in egg, then in “Italian seasoned” breadcrumbs, deep-fried, tossed in grated parmesan (which may or may not also be mixed into the breadcrumbs), and then served up smothered in marinera sauce.

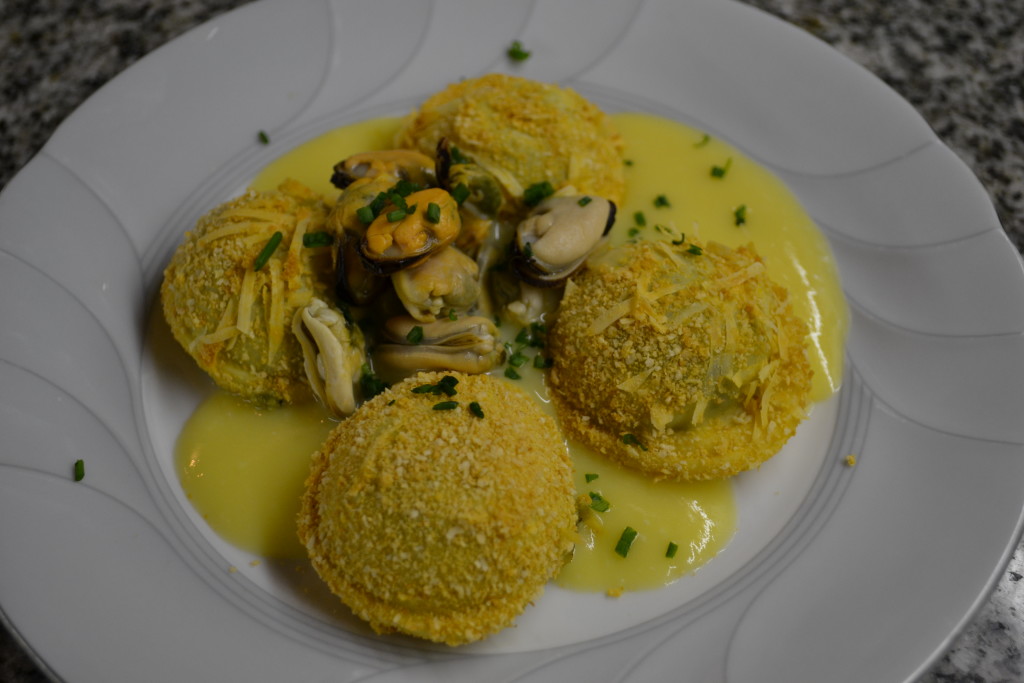
The Italians, too, make a fried ravioli – seadas – a traditional cheese filled and honey and grappa soaked dessert pasta. But, we’re talking fried here. What about all that baked? For those who want to cut out a bit of the whole deep-frying fat thing, these work out just perfectly when treated to oven cooking. And, I’ll also throw in a twist on those traditional Italian flavors – we’re going to finish these with a lemon sauce and some fresh mussels.

I’m going to trust, for this column’s purposes, that you can come up with some fresh pasta sheets, either homemade or store-bought. You’ll need about 250 grams.

Baked Ravioli

250 gm feta or ricotta cheese
250 gm fresh spinach leaves, washed and coarsely chopped
1 medium onion, chopped
2 tablespoons olive oil
salt, black pepper, nutmeg

Saute the onion in the oil until soft and just starting to color. Add the spinach and cook until well wilted. Add the crumbled cheese and mix well. Season to taste – if you use feta, which I recommend, you’ll need very little salt. Let the mixture cool and fill the ravioli, sealing them well – try to avoid air pockets – when deep-frying or baking, these have a tendency to expand quickly and you end up with a ravioli blow-out. You should end up with a couple dozen ravioli.

2 eggs
100 ml milk
200 gm breadcrumbs (approximately)
100 gm grated parmesan

Mix the breadcrumbs and parmesan. Separately, lightly beat together the eggs and milk. Dip each ravioli into the egg mix, then into the breadcrumb cheese mix, and then place on a lightly oiled baking tray (or, better yet, on a silicone baking sheet. Into the oven with the tray at 200̊C, a fairly hot oven, and bake until golden brown, about 20 minutes.

Sauce

2 eggs
juice of 2 lemons
5 tablespoons hot stock

Beat the eggs for 3 minutes in a mixer, until just starting to thicken and lighten in color, then beat in the lemon juice. Slowly add the hot (not boiling) stock, beating at the same time. Keep warm, but not too hot or the eggs will curdle.

And, finally, to round the dish out, if you’d like a little seafood with it, my favorite, and simplest preparation of mussels.

1 kg fresh mussels, washed well and de-bearded
10 gm ground black pepper

Put mussels and black pepper in a large pot, cover, no added liquid or anything else. Put over a high flame, and cook for 5-6 minutes, until the mussels all steam open in their own juices. Delicious on their own with some crusty Italian bread, or, as here, remove them from their shells and serve along with the ravioli and lemon sauce.

A series of recipes and articles that I started writing for the Buenos Aires Herald Sunday supplement, Food & Wine section, at the beginning of 2012. My original proposal to them was to take local favorite dishes and classics and lighten them up for modern day sensibilities. We’re not talking spa or diet recipes, but at the very least, making them healthier in content, particularly salt, fat and portion size. As time went by, that morphed into a recipe column that, while emphasizing food that is relatively “good for you”, wasn’t necessarily focused on local cuisine. At the beginning of 2013 I decided to stop writing for them over some administrative issues, but it was fun while it lasted.
Facebooktwitterredditpinterestlinkedinmail

Lunch steak

Umbrian veal scallops

Buenos Aires Herald
On Sunday supplement
Food and Wine

This last week I was listening to an NPR broadcast online, an interview with Eugene Gagliardi, the inventor of the Steak-Umm (and other “convenience foods”), that pale imitation of a lunch steak. It got me thinking – a couple of years ago, here in Argentina, the local Heritage Commission declared a new range of food items that were considered “emblematic” of porteño culture. Those of us who live here in our adopted country have become used to offbeat claims in casual conversation by many a local that one plate or another is Argentine in origin. Often, these dishes are ones that anyone who travels the globe or explores the world of food knows existed elsewhere in the world long before Argentina had anything but a native, indigenous cuisine. But this wasn’t some guy at the local kiosk, this was an official government announcement.

The one that generated the most controversy at the time among my circle of friends was the milanesa a la napolitana, that ubiquitous local version of a weiner schnitzel topped with ham, cheese, and a bit of tomato sauce. Much of the controversy came from the juxtaposition of “milanesa” (from Milan) and “napolitana” (from Naples). The milanesa part is easy, pounded thin, breaded and fried slices of beef or veal are called cotoletta alla milanesa in Italy, or, a “Milan style cutlet”, and have been since before the first Italian set foot on South American soil.

While the name “a la Napolitana” is both claimed locally to come from the idea of Neapolitan pizza or from a restaurant called El Napolitano that existed in the 1940s over by Luna Park; most likely this is a simple renaming of the classic Neapolitan saltimbocca alla Sorrentina – pounded thin, floured or breaded, fried slices of veal topped with Parma ham, mozzarella, and a fresh tomato sauce. The dish has been around since long before anyone from Sorrento headed to Argentina. Who knows, maybe that’s where the owners of El Napolitano were from?

One can even look at things like schnitzel “cordon bleu”, a dish dating back to some unknown time in the history of L’Ordre des Chevaliers du Saint Esprit, the organization of knights famed for their luxurious banquets since 1578… this dish a breaded cutlet topped with a thin slice of ham and melted cheese – only missing that bit of tomato sauce.

But regardless, it’s a favorite lunch, there are even restaurants dedicated to nothing but differing versions of the milanesa. And, while we may not fire up the grill just to make a casual meal, we’re quite happy to throw a couple of these lunch steaks into a pan and make our own version – generally without the breading and frying part, though trust me, we’re not going to stop you if that’s your preference. This version, a favorite here at home, is based on a traditional scallopini from Umbria.

Umbrian Veal Scallops

4 large veal scallops (milanesas de ternera)
5 cloves of garlic
1 small onion, chopped
1 small bunch basil
4 sprigs oregano
4 leaves of mint
1 sprig rosemary
¼ teaspoon dry mustard
2 salted anchovies
juice of 4 lemons
4 tablespoons apple cider vinegar
½ cup extra virgin olive oil
salt and pepper

Season the veal with salt and pepper and saute in olive oil. The remaining ingredients are pounded together in a mortar, or, in modern day, pulsed in a food processor or blender to form a sauce. Add the sauce to the pan and cook just enough to warm it. Adjust the seasoning with more salt and pepper if needed. Serve the veal slices with the sauce spooned over them, and a nice green salad on the side. Serves 4.

A series of recipes and articles that I started writing for the Buenos Aires Herald Sunday supplement, Food & Wine section, at the beginning of 2012. My original proposal to them was to take local favorite dishes and classics and lighten them up for modern day sensibilities. We’re not talking spa or diet recipes, but at the very least, making them healthier in content, particularly salt, fat and portion size. As time went by, that morphed into a recipe column that, while emphasizing food that is relatively “good for you”, wasn’t necessarily focused on local cuisine. At the beginning of 2013 I decided to stop writing for them over some administrative issues, but it was fun while it lasted.

Facebooktwitterredditpinterestlinkedinmail